Sunday, 23 December 2012

Wedding craft snippet- wish tree

I have been off work now for a week and have loved having the time to organise myself before Christmas...I even managed to get a few bits done for the wedding. I have decided to make as much of the craft finishing touches as possible primarily to keep costs down but also because I absolutely love handmade of course!

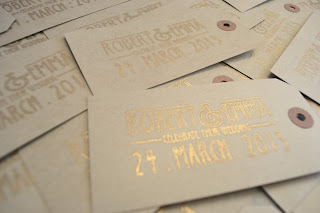
One of the tasks I had on my wedding to-do list was to prepare the luggage tags for our wedding wish tree.
I am going to ask the florist to supply the actual tree but to give you an idea, this is what I am trying to achieve...

http://www.gigglebooth.co.uk/blog/2011/12/01/wedding-wish-trees/
I ordered some brown card luggage tags and a personalised rubber stamp. I used a lovely gold ink which came up really well on the brown card.


I just need some twine to hang them up with and then they are ready to be written on by the guests on the big day! Excellent for a vintage themed wedding.

Tuesday, 11 December 2012

Something a bit different

When the nights started to draw in from about October (after one of the wettest Summers I can remember!) the usual struggle to get out of my beautifully cozy bed when my alarm goes off commenced....it is the same every year and I had decided that I had had quite enough of it thank you!

I have read articles in the past about the Lumie bodyclock and the claims that it will make getting out of bed that bit easier...I reserved judgement but decided that this was the year to put those claims to the test. I bought one of the Starter bodyclocks which I found on Amazon for £59.99. I later discovered that if you buy direct from Lumie they offer a 30 day home trial which I probably should have gone for just in case I didn't find it worked out for me. Needless to say no such trial was needed as I have been pleasantly surprised by the result.

For those who are reading this and thinking to themselves....'a Lumie what what?' the theory behind this wonderful device is that it acts as an alarm clock which wakes you up naturally (as your body intended!) by imitating sunlight through the lamp on the top of the device. You can choose to have different lengths of sunrise depending on your preference. I would say that I am a light sleeper usually so I didn't think this idea would work as I envisaged me waking up as soon as the light bulb sneaks on, but actually I usually wake up about 20 minutes into the 30 minute sunrise and I feel so much more refreshed (if that is possible).

Coincidentally, not long after buying my Lumie Starter I won a more expensive model (Lumie Active 250) in a Lumie competition! If you are thinking of investing in this piece of kit then I would recommend the more expensive model- purely and simply for the reason that it offers so much more choice. It has a radio feature and also several different sounds for you to have as a backup to the sunrise- currently I have tweeting birds which is quite nice.

I usually blog about my craft and sewing adventures but I thought I would shake it up a little by recommending this product- I know that whenever I am considering buying something like this I always read and trust customer reviews so hopefully what you have read will be worthwhile!

The moral of the story? Enter competitions- sometimes you might just win!

Sunday, 2 December 2012

It's beginning to look a lot like Christmas...

I know it has been a while since my last post...those seem to be my famous last words eh?! I have been buried under Christmas coloured felt and fabric for the last few weeks with only the whir of my sewing machine to be heard!

I signed up to the local Christmas Fair in eager excitement and hurriedly started to make preparations by purchasing felt and other materials. I decided to make tree decorations- gingerbread men being my favourite and best seller so far, along with red robins and more of my lavender hearts which always go down a treat with my customers. A new addition for this fair was to use some of the vintage teacups I had been hoarding and recycle them into teacup pin cushions and candles. I bought a teacup pin cushion a few months back at a craft fair and thought it was such a great idea. 

www.madebymyownfairhands.com
I wrapped the teacups in cellophane and pretty Christmas ribbon which made them the perfect gift!


It was a pretty successful day in the end and really got me in the Christmas mood! Although....I am trying to hold out until at least Saturday 8th December to put the tree up at home. Let's see if I last!

Here are some more pictures of my stall and makes.....


Thursday, 11 October 2012

Turning my hand to something new

Vintage Lace Wedding Invitations



 My mind has been full of wedding preparations over the last few months so I thought it was only fair to share some of my latest (wedding themed) crafts.

First on the agenda was invitations. We had never wanted a long drawn out planning process which is why we have booked everything in quick succession and the big day is only 5 months away! I have never been very good at waiting for exciting events to arrive...so, as soon as we had sorted the venue I got straight down to the business of stationery.

I managed to source some excellent cardstock from a wholesale website I tracked down. I selected broderie anglaise 'DL' style invitations with matching envelopes. For the card inserts I chose a gold colour on which I mounted the wedding details which I had printed on speciality engrossment paper. I just did this on my laptop on word, I sourced free font downloads to give my text something a bit different.

I was most excited about the finishing touches which were:

* Lace (not pictured) wrapped around each invitation
* Ribbon and pearl embellishment on the front of the invites
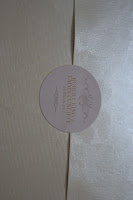
* Personalised stickers (sourced from eBay) which sealed each envelope.

It occurred to me that many of you reading my blog may also be planning your wedding and may want some inspiration and tips on how to create a professional looking invitation.

The tools I used are:
* Craft knife (Stanley or something similar)
* Glue Gun
* Double sided tape
* Snips/scissors


* Guillotine
* Lace/Ribbon
* Pearl adhesive dots
* Ruler
* Pritt Stick


1. Take the DL which is the 'pocket' to hold your card inserts. Imagine your high street voucher card which comes in a card pocket with a thumb hole to pull out the voucher. This is the idea behind this type of invitation. You may alternatively choose a pocket fold or more basic form of card design. This comes flat pack when you order wholesale i.e. you need to fold in each flap and stick it together. I used double sided tape along each side using a small piece to secure the ribbon inside the card to ensure it isn't visible on the outside. I have also seen tutorials where people have purchased tape guns which seem quite fun but sadly I had a tight budget so had to improvise. 

2. Cut down your printed paper using the guillotine. The paper will have been printed with details of your wedding. We chose one card insert stating ' We invite you to join us......etc at 1pm at.....' and then a second insert providing details of the venue, local hotels, and gift information. 

3. Mount all cut down paper onto gold (or your chosen colour!) card inserts. Trim card inserts to desired size. 

4. Apply pearl adhesive dot for decoration. 

5. Using the glue gun, fix on any embellishments to the outside of the DL pocket. 

6. The envelopes should be good to go (gladly) so pop your finished invitation in the envelope and seal with personalised label! We printed off address labels on the computer for that extra touch. 

I don't know whether this is going to be of any use to you without more detailed pictures but hopefully I have  made you realise how easy it is to craft your own invitations! I am pleased to report that the other half got fully involved and now considers the glue gun as his new best friend! ;) Smiles all round. 

I will post more wedding craft ideas soon! I am currently getting carried away with sourcing vintage suitcases and making bunting. 

Over and out. 


Monday, 10 September 2012

Wedding fever

Hello there, it seems to be a recurrent theme that I post on my blog and apologise for not having posted in such a long time....I won't bore you with that this time around.
I have been really busy with wedding preparations as me and the OH are finally tying the knot in March next year. Lots to organise and arrange, probably much more than I originally envisaged and despite not wanting to become obsessed by ribbon colours and table plans, I am finding it hard to resist the desire to get everything perfect. I strongly believe that it is the marriage and not that one, over before you know it day, which defines a relationship and I am trying not to lose sight of that. Every weekend at the moment is taken up by appointments with photographers, venue dressers, florists etc, and I have to say I am looking forward to just spending time with the OH at the weekends without having to be somewhere at a particular time (rant over).

It is quite nice that my OH's brother is due to get married in December and it is a great excuse to make another of my memory boards which is going to be the table plan for the big day. I absolutely love making them and this one was really special given that I am chief bridesmaid. I managed to source material which is as near to the colour of the bridesmaid dresses as possible, and, I must say the colour match is quite impressive when you put the two together. I then found some gorgeous coordinating ribbon- my favourite has to be the 'to have and to hold' East of India ribbon which I purchased from eBay. The plan is for the stationer to produce the table lists and then they will simply be attached onto the board itself which will sit on an easel for all to see. A great idea is to use the minature pegs which cardmakers often use, that way the fabric doesn't get spoiled by adhesive and can be used again as a memory board after the wedding day!

Watch this space for a picture of the memory board in action in December...

Monday, 30 July 2012

Everything Alice, everything Oz, a pennant and a magic circle...

Hi there guys and gals!

Life has been pretty busy since the last time I posted. I had a lovely week holiday in Lanzarote with the OH and then returned to the stress of having to speak at some seminars for work...needless to say, public speaking is not a passion of mine and, quite frankly, I would rather have been trapped in a lift for 24 hours (strange analogy I know but you get the picture). Then lots of lovely and exciting crafts took over again and balance was swiftly restored! Phew.

After making Mr Monkey (see my last post), I decided to have a go at bunting, thanks to my good friend Steph (aka @thecraftylawyer on Twitter). It is very much a work in progress, but here is a picture of my first pennant (a word I recently was taught by Steph after which I felt very enlightened).


We also did some crochet as we had both attended one of Jo Johnston's workshops (aka @frenchknots) to learn crochet from scratch. I hope to make a blanket but have realised how long it takes to make sufficient squares for a full blanket. At the moment I have one circle which (further to the picture below) has rather dodgy square edging....hmmm might be a while eh?! I don't think crochet it my forte shall we say....give me a sewing machine any day!


In other news, a few weeks ago my good friend Sarah told me about a new BBC TWO programme which is in the pipeline- The Great British Sewing Bee...think Great British Bake Off but with thread. I have now submitted my application and am waiting to hear back with baited breath....even if I am not successful in being chosen as a contestant- I cannot wait for the programme itself to reach our screens and I feel proud that sewing and craft is so popular. Whoop whoop!

Lastly- a bit of a book review.

I think I came across the books, Everything Oz and Everything Alice (authors Hannah Read-Baldrey and Christine Leech) on a blog somewhere. I ordered them both as I have always been a fan of both classic books/films. They are absolutely beautiful craft books and the illustrations and photography is brilliant.


 The Everything Alice book includes projects like Wonderland Aprons, Red Velvet Cupcakes and Mad Hatter Hats....and many of the projects would be perfect for an Alice themed birthday party. I think my favourite project is the Alice themed teacup candles which I will definitely be trying very soon.

When thumbing through the Oz book, you will come across everything from Emerald City jelly (luminous green!) to tin can lanterns.

To anyone who loves looking at inspiring pictures and likes making crafts which are quirky- these are the books for you!
I will be writing again very soon with some more adventures!

Emma x


Monday, 9 July 2012

Sock monkey has facelift

I decided a few days ago that Mr Sock Monkey needed a friend...the bunnies seem to have taken over of late so after a request from a friend for a monkey for her baby daughter- I decided to create a new and improved version. I honestly never get tired of making these lovely characters! In fact I do so much making sometimes I don't seem to find the time to blog about it. Such is life.

I am looking forward to finding another north west craft fair to take part in. I did my first one a month or so ago. Unfortunately the bad weather kept a few people away but it was still a great experience, one which I am keen to repeat and improve on. If anyone knows of any good fairs to take part in give me a whistle and I will be there with bells on. I am amassing quite a collection of new ideas and it would be great to get them out there!

Just a short post tonight to celebrate recent monkey business...over and out. X

Tuesday, 12 June 2012

First craft fair....done!

My pink memory boards....and a few extras to bulk up the table

Sock bunnies sitting proud!
I know it has been a good few weeks.... (if not months?) since I last blogged- this is because I have been frantically preparing for the local church sale in Haydock. My mother-in-law said 'why not take a table' and so I decided to bite the bullet and go for it!

I initially set about making sock bunnies to sell (for which I am eternally grateful to Danielle Lowey of Rubbish Revamped as she taught me how to make them), I soon had 12 bunnies at the same stage...ears sewn, filled with rice and stuffing, and just awaiting faces. They gathered on my coffee table looking all sorry for themselves if that is possible without a face. It took me a few weeks to get around to sewing them up and giving them eyes and a nose. Once they were complete I set about making some lavender scented hearts. These proved to be quite difficult because sewing them up by hand took an age, but trying to put a stuffed heart under my sewing machine needle was nigh on impossible. I persevered and managed to make around 15 hearts. These went down quite well with the locals so I will definitely make some more of these for future fairs.

Lastly, I set about making my memory boards (see my earlier post on this for more details). I love the memory boards probably because my dad was involved in sourcing the materials and giving me ideas on the best way to put them together. As far as dads go, I must say mine is pretty darn good, of course I am biased, but he managed to take me seriously whilst talking about craft fairs and material and actually got quite involved. I am going to focus more on the memory boards over the coming months as I think I could create some great designs for different purposes. My sister-in-law to be has asked for one for her wedding table planner so I will be concentrating on designing the perfect board for her which she can keep after the big day for all of her momentoes.

So....would I give up the day job after doing my first fair- certainly not. But I met some lovely people and got some great feedback on my makes.

x


Sunday, 29 April 2012

Mr Sock Monkey makes an appearance

 Mr Sock Monkey was found just hanging around in my house recently. Mr Sock Monkey was created after the workshop at Rubbish Revamped. I am really getting behind the whole recycling and thrifting movement recently and am challenging myself to use what I already have around my house and be more environmentally aware about what I throw away.

Mr Sock Monkey represents recycling at its best and I don't think many would guess that he once was a pair of boring old socks!

Hope you love him as much as I do!

x
Posted by Picasa
 SECOND PROJECT- SEWING ROOM WALL ART
I don't know if any of you bought the Moskys Groupon voucher recently but this is the design I chose a few months ago and the rolled up stickers have been sitting in my cupboard for months now.

Me and the other half exercised our DIY skills (or lack thereof) and painted a feature wall in my sewing room last week. I chose a shade of Dulux paint called 'Damson' which is a lovely berry shade. So this week it was time to apply the wall art! It was quite fiddly to do, and the stickers don't come with any instructions so I think the idea is to be as creative as possible in marking out your branch....the stickers are fully removable and make my room look pretty sweet.
Posted by Picasa

Becoming a thrifty individual!

 It has been a few weeks since I last shared by recent makes with you all....but I am back! With lots of completed...yes completed projects to tell you about.

FIRST PROJECT- DOTTY ABOUT MEMORY BOARDS!
I have often seen memory boards like this around in the shops and have wanted to have a go at making my very own for a while now. Well I must have been feeling very spontaneous today because I decided today was the day I was going to get it DONE!
I turned up at my parents' house this morning armed with a piece of MDF, spotty fabric, and ribbon....my dad entertained my whim by providing a workshop complete with workbench, spray glue, staple gun and his joinery expertise! We actually had a great time making this so I am sure I will treasure it! They are great for holding photos, momentoes and notes that are hanging around my sewing room....and I may well use it as an inspiration board for projects I rip out of magazines and want to start in the near future.

I am planning to start selling my memory boards at local craft fairs so hopefully I will be seeing you guys soon!
Posted by Picasa

Thursday, 19 April 2012

Sock bunnies and new friends

Hi there. In my last post I mentioned how amazed I was at the whole host of new friends I had made through twitter...I would never have believed it but a few weeks after following some really cool crafters I met up with a couple of girls at Rubbish Revamped, Chorlton, Manchester, for a workshop! The lady who runs Rubbish Revamped, Danielle, is absolutely lovely and very passionate about recycling items you find lying about the house (socks especially!) into a gift or something you would want to treasure for many years to come.

Our group chose to make sock bunnies and junk mail jewellery. I must admit I did not think it would be possible to make a child's sock into a believable bunny but a cup full of rice and some snipping and stitching later and the result was pretty darn cute...


We then moved on to Junkmail Jewellery the idea behind which is to take scraps of paper from old magazines, wrapping paper, envelopes, and as Steph quite liked- even old maps, and roll them into beads. The beads are then varnished and threaded onto jewellery thread. I chose to go for a page of Stylist magazine which had shades of yellow running through it. I was really pleased with it and could see myself trying this craft again very soon! Let me know what you think or whether you have tried anything similar?

Thursday, 12 April 2012

What an achievement! First pair of trousers...

Hello! Well I promised pictures of a completed project and hurrah- here they are...first pair of work trousers...DONE. They not only took a lot of willpower, determination and cotton but also 4 Saturday sewing workshops at Bambers in Eccles to finish them.

The end result I must admit to being proud of, but there is a cautionary tale to tell fellow seamstresses...ready to wear (ie size in the shops) is definitely not the same as the pattern sizing. I chose a size 10 as that is what I usually go for in the shops but alas, when I tried to pin fit them to myself they were way way too small! Que expert Celia at Bambers having a long hard think and coming up with the idea of creating a third panel from spare fabric for each leg! Ingenius I must say.

I also thought I should mention my recent discovery...that twitter is actually quite cool! Have been a member for a while but unfortunately got swept away by Facebook before I could realise how great twitter is. I am now well and truly fed up of facebook. I started following a few people with craft interests and all of a sudden I am tweeting away and meeting such lovely people...I have been invited to a craft workshop this weekend with Rubbish Revamped based in Manchester and can't wait to make sock bunnies with my new friends! Social networking does have some benefits after all...

Monday, 2 April 2012

Yo crafty people....

Happy Monday! Just sharing the love on a Monday...tough day at work but home to do some crafting. I got some lovely fabrics in the picture above- they are John Lewis fabrics which I found at my local haberdashery, I plan to make some aprons and use the lace and ribbon as the ties and neck strap. I was thinking they would be perfect presents! 

I am close to finishing my bombshell dress with Craftsy, I had to stop myself from buying the next course before finishing this one....not that I am a quitter but I am like a kid in a candy store....I see the patterns and projects and my eyes light up. I vow to finish the projects I have on at the moment before starting anything new....yeh right I hear you say. 

Thanks and hello to my new followers! Hope to get better at keeping you updated and share some tips and stories. 

Over and out. x

Tuesday, 20 March 2012

On my way home...finally!

Hello! Things have been rather quiet on the blogging front because I have been here there and everywhere for work this week and last. I must say its quite exhausting travelling on planes trains and automobiles (as per the classic
John Candy film) and even more exhausting waiting around for the travelling! Am glad to be waiting at the airport on way home...am 3 hours early but have settled down with my woman's own magazine to read about Fern Britton's gastric band....

As you will have read on my last post, the volume of sewing projects I have started have taken over a bit lately... I am desperate to finish my Craftsy bombshell dress this side of Christmas and I am happy to say that I now have the front section of my bodice sewn together and the cups ate looking sweet! You will see from my pictures on earlier posts (some were upside down for some reason) that I was really struggling with making my toile (or muslin as they say in the US) and after my fourth unsuccessful attempt I was more than ready to throw in the towel. I had had enough and just couldn't understand how to make the cups of the bodice bigger without meaning that the other pieces don't join together right at the seams...I told this to my pattern cutting teacher who showed me how to increase the bust cup- which should be done at the top of the cup and not at the bottom as I had thought. I somehow persuaded myself to make one last toile and hey presto it fit!!!! So I moved onto the next online lesson and can't wait to get back home and make some more of the bodice.

I already have my eye on another Craftsy course which is to make a tailored jacket but I'm trying to be strict with myself and have vowed to finish my other projects before I take on any more! We'll see how long that lasts for eh!

I will post some more pictures soon. Watch this space...

Wednesday, 14 March 2012

Hello from the isle of man!

So, I often have to come to the isle of man with work and as much as I like being out and about I am a bit of a home girl at heart...plus I have my new overlocker sat in my sewing room in its box waiting to be opened! Very excited to try it out but haven't a clue how to use it....was a spur of the moment but which I hate to say I kind of wish I had thought about a bit more- especially because my shower conked out and so we are having a brand new one...I think must be on mission to clear out my bank account this month.

Another thing I should point out is that I fear I may be getting a little bit too obsessed with this hobby- caution readers- before you know it you may have more fabric than you know what to do with, have booked yourself on so many courses and online lessons that our barely have time to wash or do your full time job (which you need to at the bills) and feel like you have taken off a bit (more like a lot) more than you can chew....hang on a minute- sounds a bit like me!

Wednesday, 7 March 2012

To my three followers.....thank you!

Thanks so much to my first 3 followers! I was blogging to no-one in particular for a few weeks....which was fine, but it is always nice to have some readers.

So....pattern cutting was pretty good last night although I got myself in a bit of a muddle when trying to draft a sleeve block (standard size mock up which you then alter to fit your exact shape)....it's actually much more technical than I ever realised! The calculator came out for some of the maths (never been my strong point) and I had points all over the page as if I were back at school drawing a graph. I searched high and low for this class and am happy to say it is really great. It is at Chorlton Adult Education service just outside Manchester and as it is in a college classroom it takes me back to my days doing textiles in high school! As you can imagine, the room has such a random collection of stuff all over the walls....different textile techniques etc. There are large pattern cutting tables- I would love love love one at home but haven't got the room!

The teacher recommended a book which apparently many colleges refer to in their syllabus when teaching pattern cutting- for those of you who are interested it is 'Metric Pattern Cutting' by Winifred Aldrich. It is pretty old but gives you the mathematical instructions you need to plot out a basic pattern block on pattern paper. The old ones are the best as I always say! I am hoping that I can design some patterns of my own eventually...watch this space.

x

Tuesday, 6 March 2012

👗🎀👠 off to pattern cutting class tonight!!!

Have nearly finished lawyering for the day at which point Tuesday means pattern cutting at Chorlton college! Have already drafted a basic bodice block and am hopefully going to get onto the sleeves and skirt tonight.

Been following some cool people on twitter (@law4elc if you want to follow me) such as the sewing directory and sewing boutique which has just gone live with a new website today! Good luck guys. Also stumbled across a blog for another lawyer sewist- I love being able to let off steam with a new project or two. Will update you on the pattern cutting ASAP! Au revoir.

Friday, 2 March 2012

Sport relief 2012

I have been listening to Radio one on the way to work this week and have to say that comedian John Bishop is an inspiration! He is going through his "week of hell" for sport relief and has basically been cycling, rowing and running from Paris to London with hardly any sleep in between- what a man! Get your phones out and donate to get that warm fuzzy feeling inside! X

Tuesday, 28 February 2012

Vogue- THE fashion bible

Check it out, I have been doing a few classes at Bambers in Eccles recently and one of the teachers recommended the vogue sewing book first published in 1975....surely things have moved on from then I hear you say- but I have to say this book is a legend if ever I saw one. The book includes a detailed guide to a host of different finishings such as French seams, ruffles, pockets etc and guides you through the work of iconic fashion designers of the era. It
Is beautifully vintage and takes you back to the Mad Men era with the pictures. If anyone else has the book I would love to hear your thoughts...I got mine from amazon marketplace but I am sure you could also find a copy in the odd charity shop. Well worth the search people. Over and out.

Friday, 24 February 2012

Dreaming of dresses!

Hello fellow seamstresses...just wanted to highly recommend the blog for better sewing by Gretchen Hirsch. She is a seamstress...(or "sewist" as they say over there) in New York and she posts great pictures of her projects many of which are vintage inspire vogue patterns. Mad Men eat your heart out! I was particularly impressed with the very easy vogue 8640 pattern she did recently which was a red suit with very sexy pencil skirt. Check it out at www.blogforbettersewing.com. Let me know what you think. Gretchen creates video courses for craftsy.com and I am currently part way through the perfect bombshell dress course...am struggling to put together my Muslin at the moment (or etoile for us Brits) but will try and post pictures of my efforts for you so you have a feel for my recent project...

Monday, 6 February 2012

First ever post!

Hi there....well if you have stumbled upon my blog it is probably because you share my passion for all things crafty....especially dressmaking and sewing in general. Welcome to my space. I am completely new at blogging so excuse the appearance whilst I get the hang of it!


A bit about me...
My name is Emma and I have been into sewing ever since I had the pleasure of trying out my nana's old Singer sewing machine on old hankerchiefs when I was around 11 years old (am now 26)....ahh those were the good old days- when all that could go wrong was turning the corner of the hankerchief and accidentally sewing off the edge....! Nowadays I worry about all kinds of strange things like notches....seam allowances....and the grain of fabric (sounding familiar???) and half the time I still end up going around in circles.

Luckily, I progressed from the hankerchiefs (sigh of relief!) onto attending some dressmaking courses in the Northern Quarter of Manchester which, by the way, is particularly good for sewing supplies (Abakhans) and vintage shops (The Junk Shop, Dale Street). Here I learnt to make a basic shift dress and put into practise various skills like inserting zips, using facings etc....

I am now going to as many courses as possible and am trying to absorb all of the knowledge like a sponge (wishful thinking...) Hopefully you can follow my journey and I will share what I can....from one seamstress to another! I aim to post pictures of projects...the good, the bad...and oh yes- the ugly in all their glory. Maybe you guys can help to point me in the right direction or visa versa.

Keep your eyes peeled!

Bye for now...

My Fair Hands x