Tuesday 17 September 2013

My New Happy Sewing Place...

It has been too long since my last post....what can I say, the world of upcycling furniture and wallpapering has consumed me for far too long! But hopefully, the pictures of my new sewing room will be worth the wait.

I live in a lovely semi-detatched with 4 bedrooms, one of which is a sizeable loft bedroom. When we moved in a few years ago, we decided to make the bedroom into a guest room complete with double bed, beautiful red glass drawers and bedside lamps....the only problem was that it lacked character and was only really used a) a few times a year when guests came to visit, and b) as a second lounge in the winter!

We have 2 small bedrooms on the middle floor of the house and I have been using the smallest of those as my craft/sewing room for a few years now. The problem with having craft as a hobby (not that I would openly admit to said problem) is that the materials for each job take up a lot of space. I found that those materials gradually ended up scattered all over the house, to the point where my husband (long suffering) decided that enough was enough and I simply had to have a bigger space. Hurrah!

We then embarked upon what can only be described as an epic journey which involved paint, sandpaper and lots of white spirit with a few painful injuries along the way. Whilst I would class myself as being 'good with my hands' (no pun intended) and can probably turn my hand to most crafts requiring a steady hand - this does not, it seems, translate into being a good painter and decorator. No matter how much my husband and I try to get a neat cutting in line, it just doesn't happen! I grew up in a family where dad did all the jobs around the house himself, being in the joinery trade it just seemed to come naturally to him, and paying someone to decorate or change light fittings was simply not the ' done thing'. Hence I really try to do home improvements myself....with a little help from my other half.

After what seemed like an age, we have finally finished what I hope will be my happiest sewing place yet! Here are some piccies. Let me know what you think!

Emma x


 I planned the room around the centre island which was made from two upcycled cupboards (previously bright blue!) and a bought worktop. The idea is that I can do my pattern cutting and fabric cutting on the island and avoid having to use the floor!
Sunday 4 August 2013

Little Bobbins

Sunny crafts


Well hello, from a very sunny sewing room indeed! I cannot explain how happy I am that we have actually had a proper Summer this year and not just a British attempt at it. Everyone just seems so much happier. The deckchairs and BBQ have found their way into my garden and heck even my sewing machine made an appearance last week when I decided it was simply too hot to sit inside.

It has been a while since my last post and I feel I should explain what has me so preoccupied of late. I have lots of exciting craft events in the pipeline and am trying my hand at 'Kids Crafternoons' with the aim of getting the little ones into being creative over the Summer. Alongside the craft classes I have launched a page on Facebook called 'Little Bobbins' (www.facebook.com/little-bobbins) and am trying my hand at making craft items for babies and kids. I am starting off with personalised fold up baby changing mats and personalised bunting....please check out my page and click 'Like' if you like what you see.

Here are some pictures...
Me and Gwen making a sock bunny


The first Crafternoon went really well and another one is planned for Saturday 31st August 1-3pm at St James's Church in Haydock. Contact me for further details or to book a place! Kids and adults are welcome...I know the adults love crafting just as much as the children! 

Little Bobbins

Personalised bunting! See Little Bobbins' Facebook page for details and to place an order. 


Personalised baby changing mats....


Sunday 2 June 2013

The Vintage Tea Dress

The Great British Sewing Bee has sparked somewhat of a sewing frenzy and I have to admit that even though I was disappointed not to make it onto the show after the auditions- I have been completely absorbed in the buzz around the contestants and the projects featured on the programme. I loved following Lauren's adventure and her blog is definitely one to check out. She has just opened up her own haberdashery and sewing studio in Birmingham (which I am well 'jel' about!) and she is offering some amazing classes alongside Tilly (aka Tilly and the buttons) and Stuart.

When I received my latest 'Sew' magazine I was delighted that there was an insert containing projects from the show! I absolutely loved the look of the Vintage Tea Dress and the instructions looked remarkably straight forward so I gave it a go...

Insert from Sew Magazine

Straight forward instructions!
Although I have quite a few years of sewing under my belt, one thing which I have always struggled with is lining. I can't work out why it befuddles me so much- I completely understand the necessity for it but whenever I try to use it, it always lets me down. My usual dilemma lies in the difference between lining each pattern piece (makes perfect sense to me!) as opposed to making the garment in the fashion fabric then also making it in the lining fabric and joining the two together. For this particular dress, the instructions didn't make provision for lining so I had to wing it so to speak.

Fabric & Lining


I loved the spotty fabric modelled in the instructions so I settled on a similar fabric in a vibrant blue colour. As the fabric was quite transparent I purchased some baby blue lining at the same time and decided to face up to my fears! The pattern is a printable one from Quadrille Publishing and is easily stuck together with sticky tape and a bit of folding. I was really attracted to the simplicity of the pattern as there were very few pieces to contend with. Front piece, back piece, sleeve piece and facings and that is your lot. Now, I probably love facings as much if not more than I hate lining, if that makes sense, so I was keen to keep the facings if possible. I read in Gertie's New Book for Better Sewing (Gertie is a New York sewing guru as far as I am concerned), that there are two choices with lining dresses. 1. Apply lining directly to outer edges of the neck and side seams and do away with facings, or 2. Use facings and apply lining to bottom of the facings. As a result of my love of facings I went with option 2.

Working with flimsy fabrics

Just a note on working with the flimsier types of fabrics....it is hard! When watching the Sewing Bee I didn't really pay too much attention when the contestants were expressing their woes towards working with flyaway fabrics...however upon pinning and cutting my blue spotty fabric I used many a swear word as my fabric started slipping and sliding under the pattern pieces. It is way more tricky than I originally envisaged and required a great deal of perseverance indeed. This added to the difficulties with the lining as I am conscious that the lining ought to be in a lighter weight fabric than the fashion fabric in order that they drape perfectly. This is another concept I struggle with. I often end up with cutting the lining and fashion fabric exactly the same size but then find myself in a right pickle when it comes to the lining accommodating the body shape. Either or both of my fabrics end up tight or baggy and generally ill fitting. This poses a problem! 

(If any of you have any tips to share they would be very welcome at this point! )


Buttons sewn onto shoulder seam line

The Result | A dress fit for tea...


Overall, despite my lining difficulties I am quite pleased with the finished dress. I have a good track record for making items and then confining them to the ottoman as I never believe they are good enough to wear. I think this time I will make an exception!

I added some buttons to the shoulder seam to jazz it up a little, together with a striking pink belt to break up the waistline.


Tea anyone?!


Next time I will be making embellished collars, courtesy of Simplicity Patterns...

Em x

Thursday 2 May 2013

Simplicity Patterns- The Peplum Shift Dress Part Two

The Peplum Shift Dress | Part Two

I am back with the second instalment on this lovely sewing project. I had so much fun making this dress and as a result of the Great British Sewing Bee I found myself strangely trying to work to a clock...."7 hours left people!" It was as if Patrick and May were in the room spurring me on...I wish! Anyway, I managed to finish but hit a few hurdles along the way.....


Stage Three | Sewing together

I had no problem following most of the Simplicity instructions for this pattern, in fact I was hurtling along at a great pace until it came to attaching the facings (front and back). This presented a few issues for me as some of the diagrams on the instructions weren't clear as to wrong and right sides of the fabric- this confused the heck out of me at times. I persevered and managed to fathom it out after a few unpicking sessions.

Stitching the sweetheart neckline- this turned out beautifully!


The fitting process- so much easier when you have a mannequin which mirrors your size
Once the facings had been figured out, the dress went straight onto the mannequin to stitch the final seams. As you can see, this process can really help achieve a great fit- especially if you have a mannequin which is pretty much the same size as you.

TIP! Pad out the mannequin to your size in specific areas....one big giveaway is the bust area- if you are lucky enough to need a bit more fabric here then why not put one of your bras on the mannequin for the fitting process??? Stuff it with a bit of padding and you're away! This will save a lot of unpicking further down the line. Of course, if you know that you always need a bit more fabric in a certain area then it is advisable to alter the pattern before the fabric is even cut.

If for example you are a size 18 bust measurement but a size 12 everywhere else then you would draw on the front and side front paper pattern pieces of this dress with a line tapering from size 12 on the hips and waist up to size 18 on the bust.


Here is the sweetheart neckline once the dress is right side out


Back view


Front view

Stage Four | Finishing touches

The final stage to any dress is always the finishing touches.
  • Catch all hems and facings down- in the case of the hem- I hand finished this with a catch stitch. This allows the garment a lot more 'move' and is a very popular vintage method.
  • Press, press press! As you can see from the pictures...my dress could do with a proper press and iron but I was so eager to get the blogpost finished! Pressing really does make the garment sparkle and when you have spent so long making something it really is a joy to see it in all its glory!


Next time.....Simplicity Collars Pattern!


Saturday 23 March 2013

Wedding day nerves | Still time for a crafty post

DRAFTED BEFORE WEDDING...published after!

Well the big day is only one sleep away and....yes....I...am....nervous. So what does a nervous bride do with herself in such a state I hear you say, put her feet up? Hit the bottle? No- a blog post is my tipple of choice! With all the wedding paraphernalia now boxed up and ready for its journey to the venue there is very little else I can do other than share a few of my last minute wedding crafts.

I have already shared quite a few photos but there a few essential makes which I have been saving for you... 

Table Plan


Our table plan has very much been a labour of love for me. When I first set out on my quest to have a handmade vintage wedding I had no idea what to name the tables. I spent so long trawling through the wedding forums for inspiration and nothing seemed to stand out. What I did know is that I definitely didn't want just numbers.

In the end I came up with the idea of naming the tables after places where the other half and I have lived over the years. When I say places, I don't mean towns, (but this is another popular idea) more along the lines of street names and building names from our childhood, university and present home. It seems to represent us quite well. 

Next, I found the beautiful vintage floral fabric and covered an A1 sized piece of MDF first with foam and then the fabric. My imagination then ran wild with the music sheets (yes I did resort to good old tea bags to create a vintage effect!), ribbon and lace. I printed out the table lists and then pegged them onto the ribbons with miniature pegs. And voila the table plan is complete. If you are planning to make something similar you should probably check that your venue provides an easel on which to display the table plan. 

Sweet Buffet

Sweets for my sweets | Sugar for my honey...
All my sweets in a row!


This idea was quite last minute if I am being honest but I am really glad we decided to go ahead with it as I am sure it will prove a popular part of the day with the sweet tooths! Some people might think that doing a sweet buffet is an added expense which is a lot of hassle to arrange....think again- the jars are from Ikea, sweets from Makro, and the labels are all home made save for the 'Keep Calm' labels which were from the internet. All in all I reckon you could do a complete buffet for around £60-70.

There are some really lovely websites out there that offer wedding DIY printables. This will help you to create the jar labels and signs for the table. The sky is the limit with creativity really and if I had more time I probably would have had a go at a sweet tree (think polystyrene ball, cocktail sticks and more sweets).

A word about poms....I made tissue paper poms for a cute little extra. I have to say that they are so easy to make but are very impressive once finished.

1. In a nutshell- take about 8 sheets of tissue paper.
2. Cut down to size (if you use full size sheets this will create one humongous pom- trust me!).
3. Stack the sheets on top of one another and then fold into a concertina.
4. Fold the concertina in half and crease. Snip the ends of the concertina either into a point or rounded off depending upon the look you are going for (spiky or rounded!).
5. Wrap a thin piece of wire around the middle of the concertina and then start peeling away the layers and 'puffing' them out. Once you have gone through all the layers you should have a ball shaped pom! Wrap some ribbon around the wire centre and then bobs your uncle! Ready made pom....pom pom pom.


Friday 22 February 2013

Fascination Station | Wedding Crafts

Well hello...I haven't posted for a week or so and I am acutely aware that I was on quite a roll there with two or three posts in one week! That has to be my best performance yet. So my next instalment is about the most amazing hen party that my friends organised last weekend. I feel so blessed to have such wonderful friends who know me inside and out. I have to thank all of them but especially my made of honour who organised the weekend so perfectly and had literally thought of everything.


I had been hoping that we would be doing an activity which would involve crafts of some sort and I was so pleased when the activity was revealed as......fascinator making! The plan was that we would make something amazing to wear on our heads later that evening when we hit the town. So after some heavy tea drinking and cake scoffing we got down to business. We were each given a small box containing all the materials we needed to get started on our creations. The boxes contained all sorts of bits and bobs including a sinamay base, a crocodile clip (or haircomb in my case), ribbons, embellishments and of course some russian veiling. Every box followed a different colour scheme. I brought down some extra bits from my craft room...of course one can never have enough ribbon and buttons to choose from.

The contents of my box...

After a few hours of sewing and drinking bubbles the fascinators were complete! Everyone was really pleased with their own creation and couldn't wait to put them on for the big night out. I absolutely loved this activity and it inspired me to try my hand at millinery. Cue accessing eBay to search for materials!

The finished fascinator

When I started this blog, entitled 'an adventure in sewing' I was indeed an amateur seamstress at heart, however as time goes on I am beginning to realise that my love actually extends to most crafts. Sewing- dressmaking in particular, will always be my first love but I am eager and excited to try anything and everything to express my creativity. Next on my list is to tackle crochet.....I attended a workshop at French Knots last Summer but found it difficult as a left-hander to translate the stitches when holding the needles the opposite way around (sounds easy but have a go!) and I am determined to give it another go....properly. My good friend has just completed the Attic 24 granny stripe blanket and I absolutely love and aspire to it! I will hopefully be posting shortly about my progress....or lack thereof.

Emma x


Tuesday 29 January 2013

Wedding Crafts | Seed Packet Favours

I was on form last weekend with wedding planning so I have enough time for another blog post....on favours! I struggled to decide what to do for favours....the OH couldn't understand why we needed to bother but for me it was just another excuse to make something craft related! (As if I need an excuse)

There is so much choice out there for favours. If tradition is your thing then sugared almonds could be given to each guest in a small organza bag. I don't particularly like almonds and wanted something a little different so I did some research and found an abundance of brilliant DIY ideas. Some of my favourite came from Martha Stewart's wedding website which  has regular features on favours. Check out the Spring, Summer, Winter sections in particular as this may determine what you choose. Bear in mind that if you want ideas from America you should omit the 'u' from 'Favor' when searching! The website is quite generous with free printables for a few ideas, here is my round up of the best...


Favour ideas...

Marshmallow love knot
Love sonnet boxes - fill with sweets or chocolates

 
Seed match books


I think that packaging is an important part of creating a successful favour and the love sonnet boxes are a perfect example of this. Realistically it doesn't matter what is inside since this homemade box is so impressive. It would be easy to print or photocopy love sonnets or an alterative might be to use sheet music. Time to search for those old piano books folks! They might come in handy after all.


I also love the idea of giving cute pots of honey. Growing up, my dad always brought home proper Lancashire honey from a local bee keeper and I still to this day love a good cuppa with a dollop of the sweet stuff! It would be easy to replicate this idea on a budget by sourcing cheap small jars (Ikea?) and filling with honey bought in bulk. Wrap each jar in tissue paper coordinating with your colour scheme and finish off with some ribbon or twine and maybe a personalised label. There are lots of talented people making personalised labels on eBay or Etsy these days.


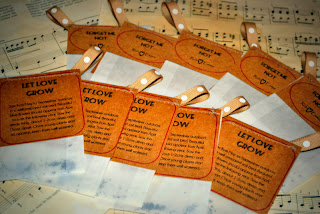
After doing a lot of research I decided that seed packets were my favourite idea so I set to work sourcing packets (not easy!) and of course seeds. I am pleased to report that I managed to make around 50 favours for the unbelievable price of £10....how you ask?! First step- source the packets.

Pintsize pots of honey!


I initially wanted to find small vintage brown envelopes but all I could find were the 'dinner money' envelopes. Being an impatient person I quickly moved onto a different type of envelope to hold the seeds. I found this picture, again on Martha Stewart's website, which I fell in love with instantly. The simplicity of a glassine envelope beautifully stitched onto some card was exactly what I was looking for. 


Sweet Pea seeds
I found some glassine envelopes on eBay (my go to place whenever I am searching for something specific) which cost around £2.00 for 50. I think in actual fact they are stamp collectors envelopes but they work brilliantly for holding seeds as they are so delicate.

Seeds...

When deciding on what seeds to fill your packets with you should choose something which represents you and your other half (here is the cheesy bit, be warned!) as it is your special day and a celebration of your love. I went with Forget Me Not seeds as this riot of blue flowers will hopefully mean our guests will remember our special day in years to come. You could also try Sweet Pea, a Wild Flower mix, or your own personal favourite.
One word of advice though...Forget Me Not seeds are a lot tinier than I gave thought to! I ordered 3000 seeds to fill 50 glassine bags and although this works out at around 60 seeds per person. When they arrived I was shocked at how tiny the seeds are and it was impossible to count them out so a bit of guess work was involved. It may be that you decide to order a larger seed which will look a bit bulkier in the envelope.
Here is the final result. I created a front and back label complete with planting instructions which I then printed onto recycled brown card stock. The fun part was sewing it all together on the sewing machine with a pretty ribbon to finish it off.

More wedding crafts next week.....vintage suitcases and photobooth props to come!