Tuesday 29 January 2013

Wedding Crafts | Seed Packet Favours

I was on form last weekend with wedding planning so I have enough time for another blog post....on favours! I struggled to decide what to do for favours....the OH couldn't understand why we needed to bother but for me it was just another excuse to make something craft related! (As if I need an excuse)

There is so much choice out there for favours. If tradition is your thing then sugared almonds could be given to each guest in a small organza bag. I don't particularly like almonds and wanted something a little different so I did some research and found an abundance of brilliant DIY ideas. Some of my favourite came from Martha Stewart's wedding website which  has regular features on favours. Check out the Spring, Summer, Winter sections in particular as this may determine what you choose. Bear in mind that if you want ideas from America you should omit the 'u' from 'Favor' when searching! The website is quite generous with free printables for a few ideas, here is my round up of the best...


Favour ideas...

Marshmallow love knot
Love sonnet boxes - fill with sweets or chocolates

 
Seed match books


I think that packaging is an important part of creating a successful favour and the love sonnet boxes are a perfect example of this. Realistically it doesn't matter what is inside since this homemade box is so impressive. It would be easy to print or photocopy love sonnets or an alterative might be to use sheet music. Time to search for those old piano books folks! They might come in handy after all.


I also love the idea of giving cute pots of honey. Growing up, my dad always brought home proper Lancashire honey from a local bee keeper and I still to this day love a good cuppa with a dollop of the sweet stuff! It would be easy to replicate this idea on a budget by sourcing cheap small jars (Ikea?) and filling with honey bought in bulk. Wrap each jar in tissue paper coordinating with your colour scheme and finish off with some ribbon or twine and maybe a personalised label. There are lots of talented people making personalised labels on eBay or Etsy these days.


After doing a lot of research I decided that seed packets were my favourite idea so I set to work sourcing packets (not easy!) and of course seeds. I am pleased to report that I managed to make around 50 favours for the unbelievable price of £10....how you ask?! First step- source the packets.

Pintsize pots of honey!


I initially wanted to find small vintage brown envelopes but all I could find were the 'dinner money' envelopes. Being an impatient person I quickly moved onto a different type of envelope to hold the seeds. I found this picture, again on Martha Stewart's website, which I fell in love with instantly. The simplicity of a glassine envelope beautifully stitched onto some card was exactly what I was looking for. 


Sweet Pea seeds
I found some glassine envelopes on eBay (my go to place whenever I am searching for something specific) which cost around £2.00 for 50. I think in actual fact they are stamp collectors envelopes but they work brilliantly for holding seeds as they are so delicate.

Seeds...

When deciding on what seeds to fill your packets with you should choose something which represents you and your other half (here is the cheesy bit, be warned!) as it is your special day and a celebration of your love. I went with Forget Me Not seeds as this riot of blue flowers will hopefully mean our guests will remember our special day in years to come. You could also try Sweet Pea, a Wild Flower mix, or your own personal favourite.
One word of advice though...Forget Me Not seeds are a lot tinier than I gave thought to! I ordered 3000 seeds to fill 50 glassine bags and although this works out at around 60 seeds per person. When they arrived I was shocked at how tiny the seeds are and it was impossible to count them out so a bit of guess work was involved. It may be that you decide to order a larger seed which will look a bit bulkier in the envelope.
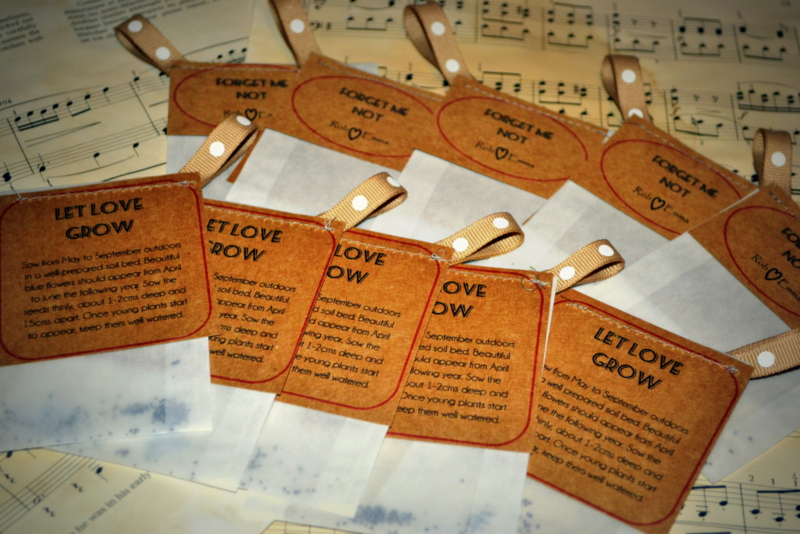
Here is the final result. I created a front and back label complete with planting instructions which I then printed onto recycled brown card stock. The fun part was sewing it all together on the sewing machine with a pretty ribbon to finish it off.

More wedding crafts next week.....vintage suitcases and photobooth props to come!


Saturday 26 January 2013

Wedding Crafts | Decoration | Wish Tree and Luggage Tags

Wedding Crafts|Decoration|Wish Tree and Luggage Tags

Ok, so here is this weekend's Wedding Craft Snippet. This post is all about wedding venue decoration...arguably the most important small detail to create a big effect. For our big day I have focussed on vintage trends as I absolutely love the 1950's/60's and the glamour and sophistication synonymous with that era. Images of vintage suitcases(think Paddington Bear), lace trimmings, pearls and wish trees spring to mind...

I am having a wedding wish tree as a vintage alternative to a traditional guest signing book. This basically involves a collection of branches or a small tree arranged and decorated with strings of pearls/gems etc. The idea is that guests use tags to write down their wishes and words of wisdom for your future together.
http://www.gigglebooth.co.uk/blog/2011/12/01/wedding-wish-trees/
I found this great image on gigglebooth's blog which shows what you can achieve with a few strings of crystals and some customised tags.

As my wedding will feature a vintage suitcase for guests to leave wedding cards in as an alternative to a postbox, I decided that luggage tags would be perfect for guests to hang on the tree branches.

Vintage Luggage Tags Personalised
I found perfect luggage tags on eBay for a few pounds. I then bought a personalised rubber stamp from eBay and a gold ink pad from The Range. I was really pleased with the result!

I have found that venue decoration doesn't have to cost the earth, in fact I would say that most of my favourite items come in at less than ten pounds. When you read my post about wedding favours you will see what I mean!


Saturday 19 January 2013

Here comes the bride

Wedding post! 

Since my wedding crafts take up so much of my time I think it is only fair to share all of my makes with you. Today I am going to share a labour of love which is probably my favourite and most special make so far....my bouquet! As I am a craft obsessed person a button bouquet was a must for me and I love the idea of being able to keep such a special part of our big day. 

Buttons

When I first suggested to my mum that I was going to make a button bouquet she looked at me as if I had gone stark raving mad. I decided the only way to prove to her I wasn't insane was to make a bouquet even she would be proud of. So I started collecting buttons! I found some great Boofle buttons in The Range which were the perfect colour....a mix of ivory and creams in all different shapes and sizes.

Wire- gauge?


Then for the wire- this bit was tricky as I didn't fully understand the gauge measurements and the fact that the larger the gauge number the thinner the wire! I visited Country Baskets (Astley, Manchester) which stocks all kinds of floristry goods. It took me a while to find the right thickness of wire since it needs to be thin enough to mould but thick enough that it will stand up with the weight of the buttons, as a flower stem would. 

Get making!


I then set to work making around 100 stems with different combinations of buttons. I also visited lots of markets and haberdashery stalls where I found some beautiful vintage and unusual buttons to add into my bouquet. I was so excited and eager to put all the stems together! I have seen other button bouquets which have just button stems but I used a silk flower posy to work around with my stems. This was perfect since you can tape the stems to the handle as you go along. 

Finishing touches


Once I had finished inserting all the stems I wrapped the base of the bouquet with lace to hide the green stems. I then wrapped the handle with ivory ribbon and secured with pearl headed pins. I am really pleased with my first button bouquet and it has inspired me to make more!

What is really special about button bouquets is that you can work family jewellery or bits and bobs which mean something to you. For example, I used one of my grandma's rings and also some earrings which my other half had bought me many years ago. Another great addition would be brooches which you can pick up quite cheaply from places like Primark etc to add a bit of sparkle.

I will be back soon with more wedding craft ideas!
x

Thursday 10 January 2013

New Year New Start

Happy New Year to you all! I am possibly 10 days late in saying this but you will be pleased to hear that I am starting a fresh and pledge to blog much more than I currently do (she says). I follow so many brilliant blogs and I always admire how often the authors manage to update them.

New Years resolutions? Well, 2013 is going to be an exciting year. Firstly I am going to become a 'Mrs' which is a milestone in itself. See some of my earlier posts for bride DIY! Secondly, I dream of transforming my adventure in sewing into something which would pay the bills....now I am sure that many of my crafty friends would share in this dream and I am well aware that making it a reality is something quite different altogether. The passage from hobby to business will not be easy but I am willing to give it a good go. I have met so many lovely people who have succeeded in this quest and I truly believe that it is possible. I will try to document my attempts on my blog and I hope to develop my website www.madebymyownfairhands.com and my product range.

I look forward to reading all of your blogs and comments in 2013 and would like to thank you all for your support.

Here's to us!